Chisel is a hardware description language embedded in Scala language. Compared to VHDL/Verilog Chisel it’s a high-level language. With Chisel it’s easier to parametrize and to abstract your hardware. It’s the language used for all SiFive RISC-V cores and for Google Edge TPU.
What’s great with chisel that it generate Verilog sources for synthesis. And we can use this Verilog generated design for simulation or formal prove.
Simulation can be done in Scala with chisel.testers. But this tester is mostly under development project for the moment. And there is no test library for common busses and devices like SPI, Wishbone, AXI, PWM, …
CocoTB is a cosimulation testbench framework written in Python. Main advantage of CocoTB is that you write your testbench stimulis in python language. Python is really comfortable programming language. The other advantage of using CocoTB is that there is a growing library of modules available to test devices like SPI, Wishbone, USB, uart, … And its easier to use a library than to reinvent the wheel.
Then, let’s write Chisel testbench with CocoTB !
As an example we will use the ChisNesPad project (yes, same as formal prove article).
The directory structure is following :
/
|-- build.sbt  <- scala build configuration
|-- src/   <- all chisel sources
|   |-- main/
|       |-- scala/
|           |-- chisnespad.scala <- Chisel module we will test
|           |-- snespadled.scala <- "top" module to test with
|                                    tang nano (gowin)
|-- formal/   <- formal directory
|-- platform/ <- some usefull files for synthesis with
|                final platform (gowin).
|-- cocotb/   <- python cocotb tests
    |-- chisnespad/ <- test for chisnespad core
    |   |-- Makefile    <- makefile to compile and launch simulation
    |   |-- test_chisnespad.py <- cocotb stimulis
    |-- snespadled/ <- test for «top» project that toggle leds
        |              when push buttons
        |-- Makefile
        |-- test_snespadled.py
To launch tests we needs following dependencies :
- Icarus Verilog : for simulation
- Python 3: This example use python 3.7. It can be compiled and used with virtualenv
- sbt: The scala build system
- Chisel : The official website explain how to use it
- CocoTB: and of course it need CocoTB that can be installed with python (
python -m pip install cocotb) - cocotbify: python package included in repository chisverilogutil. Its used to inject some Verilog code in top module to generate VCD traces.
- fpgamacro: it’s a Chisel library used to instantiate some fpga-specific RawModule. In our case it’s for ResetGen block.
- gtkwave: VCD waveforms viewer.
Once all dependencies installed we can clone the chisNesPad project :
$ git clone https://github.com/Martoni/chisNesPad.gitThen launch simulation :
$ cd chisNesPad/cocotb/chisnespad/
$ make
make[1]: Entering directory '/home/fabien/myapp/chisNesPad/cocotb/chisnespad'

[...] lots of compilation lines [...]

/myapp/chisNesPad/cocotb/chisnespad/build/libs/x86_64:/usr/local/lib:/usr/local/lib:/usr/local/lib:/usr/local/lib:/usr/local/lib MODULE=test_chisnespad \
        TESTCASE= TOPLEVEL=ChisNesPad TOPLEVEL_LANG=verilog COCOTB_SIM=1 \
        /usr/local/bin/vvp -M /home/fabien/myapp/chisNesPad/cocotb/chisnespad/build/libs/x86_64 -m gpivpi sim_build/sim.vvp
     -.--ns INFO     cocotb.gpi                                  gpi_embed.c:103  in embed_init_python               Using virtualenv at /home/fabien/pyenv/pyenv37/bin/python.
     -.--ns INFO     cocotb.gpi                                GpiCommon.cpp:91   in gpi_print_registered_impl       VPI registered
     0.00ns INFO     Running tests with Cocotb v1.2.0 from /home/fabien/pyenv/pyenv37/lib/python3.7/site-packages
     0.00ns INFO     Seeding Python random module with 1583180134
     0.00ns INFO     Found test test_chisnespad.always_ready
     0.00ns INFO     Found test test_chisnespad.double_test
     0.00ns INFO     Found test test_chisnespad.simple_test
     0.00ns INFO     Running test 1/3: always_ready
     0.00ns INFO     Starting test: "always_ready"
                     Description: None
VCD info: dumpfile ChisNesPad.vcd opened for output.
401300.00ns INFO     Test Passed: always_ready
401300.00ns INFO     Running test 2/3: double_test
401300.00ns INFO     Starting test: "double_test"
                     Description: None
436000.00ns INFO     Value read CAFE
470420.00ns INFO     Value read DECA
471440.00ns INFO     Test Passed: double_test
471440.00ns INFO     Running test 3/3: simple_test
471440.00ns INFO     Starting test: "simple_test"
                     Description: None
506140.00ns INFO     Value read CAFE
507160.00ns INFO     Test Passed: simple_test
507160.00ns INFO     Passed 3 tests (0 skipped)
507160.00ns INFO     *************************************************************************
                     ** TEST                          PASS/FAIL  SIM TIME(NS)  REAL TIME(S)  RATIO(NS/S) **
                     *************************************************************************
                     ** test_chisnespad.always_ready    PASS       401300.00          2.78    144519.92  **
                     ** test_chisnespad.double_test     PASS        70140.00          0.49    143736.56  **
                     ** test_chisnespad.simple_test     PASS        35720.00          0.25    144120.85  **
                     **************************************************************************************

507160.00ns INFO     *************************************************************************************
                     **                                 ERRORS : 0                                      **
                     *************************************************************************************
                     **                               SIM TIME : 507160.00 NS                           **
                     **                              REAL TIME : 3.52 S                                 **
                     **                        SIM / REAL TIME : 144276.59 NS/S                         **
                     *************************************************************************************

507160.00ns INFO     Shutting down...
make[1]: Leaving directory '/home/fabien/myapp/chisNesPad/cocotb/chisnespad'
(Note : I can’t find how to change width of code text in this #*/% wordpress )
And we can see wave form with gtkwave:
$ gtkwave ChisNesPad.vcd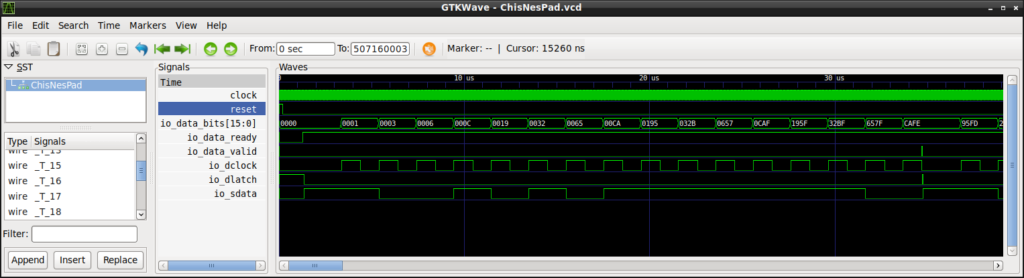
Let’s see what happen
All commands are described in the Makefile in directory chisNesPad/cocotb/chisnespad/.
Chisel Module
The Chisel Module we test here is in directory src/main/scala/chisnespad/ and is named chisnespad.scala with following interfaces :
class ChisNesPad (val mainClockFreq: Int = 100,
                  val clockFreq: Int = 1,
                  val regLen: Int = 16) extends Module {
  val io = IO(new Bundle{
    /* SNES Pinout */
    val dclock = Output(Bool())
    val dlatch = Output(Bool())
    val sdata  = Input(Bool())
    /* read/valid output */
    val data = Decoupled(Output(UInt(16.W)))
  })
//...
}
The scala verilog generator driver is given at the end of file :
object ChisNesPad extends App {
  println("Generating Verilog sources for ChisNesPad Module")
  chisel3.Driver.execute(Array[String](), () => new ChisNesPad)
}
This object will be called by SBT following command:
$ sbt "runMain chisnespad.ChisNesPad"Generated Verilog
This will generate the Verilog file named ChisNesPad.v in root directory. With following interfaces :
module ChisNesPad(
  input         clock,
  input         reset,
  output        io_dclock,
  output        io_dlatch,
  input         io_sdata,
  input         io_data_ready,
  output        io_data_valid,
  output [15:0] io_data_bits
);
//...
endmodule
As we can see, all bundled ports are kept but with little modification : dot ‘.’ are replaced by underscore ‘_’. clock and reset has been added and we can retrieve our decoupled signal io.data.{ready, valid, bits} -> io_data_{ready, valid, bits} .
CocoTB testbench
With these changes in mind, we can read/write our chisel ports signals with CocoTB.
CocoTB tests are described in file test_chisnespad.py. This file describe a class to store all method and data for testing ChisNesPad Module then list cocotb test function :
# main class for all test
class ChisNesPadTest(object):
    """
    """
    LOGLEVEL = logging.INFO
    PERIOD = (20, "ns")
    SUPER_NES_LEN = 16
    NES_LEN = 8

    def __init__(self, dut, reg_init_value=0xcafe, reg_len=16):
        if sys.version_info[0] < 3:
            raise Exception("Must be using Python 3")
        self._dut = dut
#...
# all tests
@cocotb.test()
def simple_test(dut):
    cnpt = ChisNesPadTest(dut)
    yield cnpt.reset()
    yield Timer(1, units="us")
    dut.io_data_ready <= 1
#...

@cocotb.test()#skip=True)
def double_test(dut):
    cnpt = ChisNesPadTest(dut)
    yield cnpt.reset()
#...

@cocotb.test()
def always_ready(dut):
    cnpt = ChisNesPadTest(dut)
    yield cnpt.reset()
#...
Here we see tree tests decorated with @cocotb.test(). The our module ChisNesPad is the Device Under Test (DUT) and is passed in test function arguments : dut.
To access input/output ports we just have to use dot on our dut object.
- set io.data.ready to logic level ‘1’ :
dut.io_data_ready <= 1- read io.data.bits
vread = int(dut.io_data_bits)- We can also read register under the module or a submodule :
countvalue = int(dut.countReg)It’s also possible to write register under the module, but be careful of the race condition when you doing that. It can be re-written by simulation with 0-delay.
Get Waveform
All tests can be done with procedure describe above. But with Icarus as simulator we don’t get the waveforms.
It’s not easy to develop HDL without any waveform. To get waveform we can use another simulator that will generate the traces (mainly in VCD format) but Icarus is mature and free then it’s cheaper to use it.
The solution given in CocoTB documentation is to add following verilog code in top module :
`ifdef COCOTB_SIM
initial begin
  $dumpfile ("ChisNesPad.vcd");
  $dumpvars (0, ChisNesPad);
  #1;
end
`endif
With this $dumpX() function we will records all signals under the file named ChisNesPad.vcd. If we had to add this code by hand each time we re-generate verilog from Chisel module, it would quickly become painful.
That why we use the tool cocotbify, included in package chisverilogutils.
$ cocotbify
Usages:
cocotbify.py [options]
-h, --help             print this help
-v, --verilog          verilog filename to modify (filename is used
                       as module name)
-o, --output filename  output filename
This tool will take a verilog source as input and generate an output with dumpvars code added for cocotb. In the example makefile the output name will be ChisNesPadCocotb.v. This file will be used by CocoTB and Icarus for simulation. VCD file can then be view with gtkwave:
$ gtkwave ChisNesPad.vcdConclusion
As we can see, it’s perfectly possible to use CocoTB framework for testing Chisel components. CocoTB has more library test modules available than chisel.tester and we can code in Python. Python is used by lots of peoples through the world and is less scary than Scala or SystemVerilog for hardware engineers that develop digital hardware.