Le monde du FPGA (et de l’ASIC) regorge aujourd’hui de langages de description matériel. Au Verilog et VHDL s’ajoute maintenant tout un tas de langages comme Migen, Clash, BlueSpec, Amaranth, Chisel, SpinalHDL, Silice, … et j’en oublie plein. Tous ces langages permettent de générer du Verilog. Les possibilité de conversion de VHDL vers Verilog ne sont maintenant plus une utopie grâce aux évolutions de GHDL et de Yosys.
Bref, il existe désormais toujours une possibilité de convertir l’intégralité du projet en Verilog de manière à le simuler et synthétiser avec les outils conçus pour lui.
C’est quelque chose de très appréciable pour faire de la réutilisation de code. Il n’est plus nécessaire de re-concevoir un composant en VHDL tout ça parce que le contrôleur open source qui nous est nécessaire est codé en Verilog.
L’homogénéité de langage des sources d’un projet peut cependant être appréciable dans certain cas. Notamment quand le langage de description possède ses propres librairies de simulation comme c’est le cas en Chisel.
On peut certes instancier les «sous»-modules Verilog au moyen de BlackBox, mais ils ne seront pas simulable avec ChiselTest par exemple car treadle se cassera les dents dessus.
C’est là qu’intervient le nouveau projet nommé sv2chisel pour convertir du (system)Verilog en chisel.
Je vous propose ici de tester ensemble l’utilitaire dans un cas pratique. Je souhaite convertir le module Verilog fake_differential du projet d’exemple de l’ulx3s qui permet de générer un signal HDMI différentiel pour l’intégrer dans le projet HdmiCore écrit en Chisel. L’objectif étant de porter le projet HdmiCore sur la plate-forme ulx3s en restant dans du pure Chisel.
Installation de l’outil
Toutes les caractéristiques et limitations du convertisseur sont données sur le wiki. Pour l’installer nous allons cloner le projet github. Le projet n’en est pas à sa version 1.0, il est sans doute préférable de «travailler» sur le main du git plutôt que sur une release.
$ git clone https://github.com/ovh/sv2chisel.git
$ cd sv2chisel
Les étapes d’installations depuis les sources sont données dans le readme. Il faut publier localement sv2chisel ainsi que les «helpers» :
$ sbt publishLocal
Cette commande fonctionne pas chez moi, je pensais naïvement que c’était la même commande que celle consistant à lancer sbt puis taper «publishLocal» mais non 😉
Donc pour publier localement, on fera plutôt comme recommandé dans le readme :
Pour convertir en Chisel, on peut simplement donner les noms des fichiers sources en arguments:
$ ./sv2chisel fake_differential.v
[log] ---- Processing project ----
[log] ############# Parsing fake_differential.v #############
[log] ######### Elapsed time for fake_differential.v #########
[log] # Lexing+Parsing Time : 335.206505 ms
[log] # Mapping to IR Time : 126.985877 ms
[log] ######### Executing 18 transforms #########
[log] ####### sv2chisel.transforms.CheckUseBeforeDecl #######
[log] # Elapsed time : 26.214516 ms
[log] ####### sv2chisel.transforms.CheckScopes #######
[log] # Elapsed time : 7.222317 ms
[log] ####### sv2chisel.transforms.CheckBlockingAssignments #######
[log] # Elapsed time : 1.448437 ms
[log] ####### sv2chisel.transforms.InferDefLogicClocks #######
[info] Registering a new clock clk_shift for module fake_differential (non blocking assignment) at fake_differential.v:3:0>>54:0
[warn] Unable to find module module ODDRX1F instanciated as ddr_p_instance in current module fake_differential for clock inference processing. at fake_differential.v:33:10>>41:11
[warn] Unable to find module module ODDRX1F instanciated as ddr_n_instance in current module fake_differential for clock inference processing. at fake_differential.v:42:10>>50:11
[log] # Elapsed time : 41.125895 ms
[log] ####### sv2chisel.transforms.PropagateClocks #######
[warn] Module ODDRX1F referenced by instance ddr_p_instance cannot be found in current design. Clock & Reset management might be inaccurate. at fake_differential.v:33:10>>41:11
[warn] Module ODDRX1F referenced by instance ddr_n_instance cannot be found in current design. Clock & Reset management might be inaccurate. at fake_differential.v:42:10>>50:11
[log] # Elapsed time : 1.878423 ms
[log] ####### sv2chisel.transforms.FlowReferences #######
[info] Declaring actual port directions for module fake_differential at fake_differential.v:5:2->8
[info] Running FlowReference Transform another time on module fake_differential at fake_differential.v:3:0>>54:0
[log] # Elapsed time : 28.311422 ms
[log] ####### sv2chisel.transforms.InferUInts #######
[info] Converting in_clock to UInt based on its usage in the module at fake_differential.v:7:9->11
[info] Converting tmds[_] to UInt based on its usage in the module at fake_differential.v:11:10->12
[log] # Elapsed time : 30.181078 ms
[log] ####### sv2chisel.transforms.InferParamTypes #######
[log] # Elapsed time : 5.803376 ms
[log] ####### sv2chisel.transforms.TypeReferences #######
[critical] Unsupported Type 'Bool' for subindex expression 'out_n[i]' at fake_differential.v:47:15->22
[log] # Elapsed time : 18.082934 ms
[log] ####### sv2chisel.transforms.LegalizeExpressions #######
[warn] Unknown remote type for port #2 (Q) of instance ddr_p_instance of module ODDRX1F: casting by reference by default at fake_differential.v:38:12->23
[critical] Unsupported Type 'Bool' for subindex expression 'out_n[i]' at fake_differential.v:47:15->22
[warn] Unknown remote type for port #2 (Q) of instance ddr_n_instance of module ODDRX1F: casting by reference by default at fake_differential.v:47:12->23
[log] # Elapsed time : 29.292823 ms
[log] ####### sv2chisel.transforms.FixFunctionImplicitReturns #######
[log] # Elapsed time : 1.314473 ms
[log] ####### sv2chisel.transforms.NameInstancePorts #######
[log] # Elapsed time : 2.628666 ms
[log] ####### sv2chisel.transforms.RemovePatterns #######
[log] # Elapsed time : 4.862502 ms
[log] ####### sv2chisel.transforms.RemoveConcats #######
[log] # Elapsed time : 3.143862 ms
[log] ####### sv2chisel.transforms.AddDontCare #######
[log] # Elapsed time : 1.28653 ms
[log] ####### sv2chisel.transforms.LegalizeParamDefaults #######
[warn] Cannot find module ODDRX1F in current project at fake_differential.v:33:10>>41:11
[warn] Cannot find module ODDRX1F in current project at fake_differential.v:42:10>>50:11
[log] # Elapsed time : 4.072062 ms
[log] ####### sv2chisel.transforms.FixReservedNames #######
[log] # Elapsed time : 4.126536 ms
[log] ####### sv2chisel.transforms.ToCamelCase #######
[log] # Elapsed time : 0.830815 ms
[log] # Total Elapsed time running transforms : 216.675871 ms
[log] ######### EMISSION #########
[log] ######### CHISELIZING fake_differential.v #########
[info] At fake_differential.v:11: Emitting unpacked for node tmds
[info] At fake_differential.v:18: Emitting unpacked for node R_tmds_p
[info] At fake_differential.v:18: Emitting unpacked for node R_tmds_n
[log] # Elapsed time : 21.267262 ms
[log] ######### EMITTING to /fake_differential.scala #########
Exception in thread "main" java.io.FileNotFoundException: /fake_differential.scala (Permission denied)
at java.base/java.io.FileOutputStream.open0(Native Method)
at java.base/java.io.FileOutputStream.open(FileOutputStream.java:291)
at java.base/java.io.FileOutputStream.(FileOutputStream.java:234)
at java.base/java.io.FileOutputStream.(FileOutputStream.java:123)
at java.base/java.io.FileWriter.(FileWriter.java:66)
at sv2chisel.Emitter$.$anonfun$emitChisel$9(Emitter.scala:174)
at sv2chisel.Utils$.time(Utils.scala:185)
at sv2chisel.Emitter$.$anonfun$emitChisel$1(Emitter.scala:163)
at scala.collection.TraversableLike.$anonfun$map$1(TraversableLike.scala:286)
at scala.collection.mutable.ResizableArray.foreach(ResizableArray.scala:62)
at scala.collection.mutable.ResizableArray.foreach$(ResizableArray.scala:55)
at scala.collection.mutable.ArrayBuffer.foreach(ArrayBuffer.scala:49)
at scala.collection.TraversableLike.map(TraversableLike.scala:286)
at scala.collection.TraversableLike.map$(TraversableLike.scala:279)
at scala.collection.AbstractTraversable.map(Traversable.scala:108)
at sv2chisel.Emitter$.emitChisel(Emitter.scala:134)
at sv2chisel.Driver$.emitChisel(Driver.scala:66)
at sv2chisel.Main$.$anonfun$new$10(Main.scala:159)
at scala.collection.immutable.List.foreach(List.scala:431)
at sv2chisel.Main$.delayedEndpoint$sv2chisel$Main$1(Main.scala:157)
at sv2chisel.Main$delayedInit$body.apply(Main.scala:55)
at scala.Function0.apply$mcV$sp(Function0.scala:39)
at scala.Function0.apply$mcV$sp$(Function0.scala:39)
at scala.runtime.AbstractFunction0.apply$mcV$sp(AbstractFunction0.scala:17)
at scala.App.$anonfun$main$1$adapted(App.scala:80)
at scala.collection.immutable.List.foreach(List.scala:431)
at scala.App.main(App.scala:80)
at scala.App.main$(App.scala:78)
at sv2chisel.Main$.main(Main.scala:55)
at sv2chisel.Main.main(Main.scala)
Après de multiple messages plus ou moins critiques, la commande se termine sur une étonnante erreur java de fichier non trouvé. Visiblement il faut lui fournir le path complet en argument (sans doute un bug) :
 ./sv2chisel /opt/chiselmod/sv2chisel/utils/bin/fake_differential.v
[log]  ---- Processing project  ----
[log] ############# Parsing /opt/chiselmod/sv2chisel/utils/bin/fake_differential.v #############
[log] ######### Elapsed time for /opt/chiselmod/sv2chisel/utils/bin/fake_differential.v #########
[log] # Lexing+Parsing Time : 337.962186 ms
[log] # Mapping to IR Time  : 123.022396 ms
[log] ######### Executing 18 transforms #########
[log]    ####### sv2chisel.transforms.CheckUseBeforeDecl #######
[log]    # Elapsed time : 24.704003 ms
[log]    ####### sv2chisel.transforms.CheckScopes #######
[log]    # Elapsed time : 6.588446 ms
[log]    ####### sv2chisel.transforms.CheckBlockingAssignments #######
[log]    # Elapsed time : 1.838544 ms
[log]    ####### sv2chisel.transforms.InferDefLogicClocks #######
[info] Registering a new clock `clk_shift` for module fake_differential (non blocking assignment) at /opt/chiselmod/sv2chisel/utils/bin/fake_differential.v:3:0>>54:0
[warn] Unable to find module module ODDRX1F instanciated as ddr_p_instance in current module fake_differential for clock inference processing. at /opt/chiselmod/sv2chisel/utils/bin/fake_differential.v:33:10>>41:11
[warn] Unable to find module module ODDRX1F instanciated as ddr_n_instance in current module fake_differential for clock inference processing. at /opt/chiselmod/sv2chisel/utils/bin/fake_differential.v:42:10>>50:11
[log]    # Elapsed time : 37.088031 ms
[log]    ####### sv2chisel.transforms.PropagateClocks #######
[warn] Module ODDRX1F referenced by instance ddr_p_instance cannot be found in current design. Clock & Reset management might be inaccurate. at /opt/chiselmod/sv2chisel/utils/bin/fake_differential.v:33:10>>41:11
[warn] Module ODDRX1F referenced by instance ddr_n_instance cannot be found in current design. Clock & Reset management might be inaccurate. at /opt/chiselmod/sv2chisel/utils/bin/fake_differential.v:42:10>>50:11
[log]    # Elapsed time : 1.73635 ms
[log]    ####### sv2chisel.transforms.FlowReferences #######
[info] Declaring actual port directions for module fake_differential at /opt/chiselmod/sv2chisel/utils/bin/fake_differential.v:5:2->8
[info] Running FlowReference Transform another time on module fake_differential at /opt/chiselmod/sv2chisel/utils/bin/fake_differential.v:3:0>>54:0
[log]    # Elapsed time : 25.221955 ms
[log]    ####### sv2chisel.transforms.InferUInts #######
[info] Converting in_clock to UInt based on its usage in the module at /opt/chiselmod/sv2chisel/utils/bin/fake_differential.v:7:9->11
[info] Converting tmds[_] to UInt based on its usage in the module at /opt/chiselmod/sv2chisel/utils/bin/fake_differential.v:11:10->12
[log]    # Elapsed time : 29.58874 ms
[log]    ####### sv2chisel.transforms.InferParamTypes #######
[log]    # Elapsed time : 5.646461 ms
[log]    ####### sv2chisel.transforms.TypeReferences #######
[critical] Unsupported Type 'Bool' for subindex expression 'out_n[i]' at /opt/chiselmod/sv2chisel/utils/bin/fake_differential.v:47:15->22
[log]    # Elapsed time : 18.257447 ms
[log]    ####### sv2chisel.transforms.LegalizeExpressions #######
[warn] Unknown remote type for port #2 (Q) of instance ddr_p_instance of module ODDRX1F: casting by reference by default at /opt/chiselmod/sv2chisel/utils/bin/fake_differential.v:38:12->23
[critical] Unsupported Type 'Bool' for subindex expression 'out_n[i]' at /opt/chiselmod/sv2chisel/utils/bin/fake_differential.v:47:15->22
[warn] Unknown remote type for port #2 (Q) of instance ddr_n_instance of module ODDRX1F: casting by reference by default at /opt/chiselmod/sv2chisel/utils/bin/fake_differential.v:47:12->23
[log]    # Elapsed time : 21.168114 ms
[log]    ####### sv2chisel.transforms.FixFunctionImplicitReturns #######
[log]    # Elapsed time : 0.631086 ms
[log]    ####### sv2chisel.transforms.NameInstancePorts #######
[log]    # Elapsed time : 1.467731 ms
[log]    ####### sv2chisel.transforms.RemovePatterns #######
[log]    # Elapsed time : 5.09245 ms
[log]    ####### sv2chisel.transforms.RemoveConcats #######
[log]    # Elapsed time : 2.749951 ms
[log]    ####### sv2chisel.transforms.AddDontCare #######
[log]    # Elapsed time : 1.251281 ms
[log]    ####### sv2chisel.transforms.LegalizeParamDefaults #######
[warn] Cannot find module ODDRX1F in current project at /opt/chiselmod/sv2chisel/utils/bin/fake_differential.v:33:10>>41:11
[warn] Cannot find module ODDRX1F in current project at /opt/chiselmod/sv2chisel/utils/bin/fake_differential.v:42:10>>50:11
[log]    # Elapsed time : 3.092851 ms
[log]    ####### sv2chisel.transforms.FixReservedNames #######
[log]    # Elapsed time : 4.132691 ms
[log]    ####### sv2chisel.transforms.ToCamelCase #######
[log]    # Elapsed time : 0.890969 ms
[log] # Total Elapsed time running transforms : 195.82181 ms
[log] ######### EMISSION #########
[log] ######### CHISELIZING /opt/chiselmod/sv2chisel/utils/bin/fake_differential.v #########
[info] At /opt/chiselmod/sv2chisel/utils/bin/fake_differential.v:11: Emitting unpacked for node tmds
[info] At /opt/chiselmod/sv2chisel/utils/bin/fake_differential.v:18: Emitting unpacked for node R_tmds_p
[info] At /opt/chiselmod/sv2chisel/utils/bin/fake_differential.v:18: Emitting unpacked for node R_tmds_n
[log] # Elapsed time : 25.374274 ms
[log] ######### EMITTING to //opt/chiselmod/sv2chisel/utils/bin/fake_differential.scala #########
[log] # Elapsed time : 17.429649 ms
Il y a sans doute beaucoup de chose a parametrer aux petits oignons pour bien utiliser l’outils, mais le résultat «en l’état» est déjà assez intéressant (commentaires FLF ajoutés):
package // FLF: à rajouter à la main ?
// FLF: on comprend pourquoi il voulait un path complet,
//      il le prend pour le nom du package
package .opt.chiselmod.sv2chisel.utils.bin

import chisel3._
// FLF: commentaires gardés, bien.
// DDR mode uses Lattice ECP5 vendor-specific module ODDRX1F

class fake_differential() extends Module { // used only in DDR mode
  // [1:0]:DDR [0]:SDR TMDS
  val in_clock = IO(Input(UInt(2.W)))
  val in_red = IO(Input(Bool()))
  val in_green = IO(Input(Bool()))
  val in_blue = IO(Input(Bool()))
  // [3]:clock [2]:red [1]:green [0]:blue
  val out_p = IO(Output(Vec(4, Bool())))
  val out_n = IO(Output(Bool()))
// FLF: hmm, j'aurais pas traduit un tableau «wire» par une Mem()
//      chisel, pas sûr que ça marche bien cette affaire.
  val tmds = Mem(4,UInt(2.W))
  tmds(3) := in_clock
  tmds(2) := in_red
  tmds(1) := in_green
  tmds(0) := in_blue

  // register stage to improve timing of the fake differential
  val R_tmds_p = Mem(4,Vec(2, Bool()))
  val R_tmds_n = Mem(4,Vec(2, Bool()))
  // genvar i;
  for(i <- 0 until 4){
    R_tmds_p(i) := tmds(i).asBools
    R_tmds_n(i) := ( ~tmds(i)).asBools
  }

  // output SDR/DDR to fake differential

  // FLF: les generate sont détecté et traduit également.
  // genvar i;
  for(i <- 0 until 4){
    // FLF: connexion des primitives sans broncher
    //      Il faudra tout de même inclure la définition
    //      de la blackbox à la main par la suite (import)
    val ddr_p_instance = Module(new ODDRX1F)
    ddr_p_instance.D0 := R_tmds_p(i)(0)
    ddr_p_instance.D1 := R_tmds_p(i)(1)
    out_p(i) := ddr_p_instance.Q.asTypeOf(out_p(i))
    ddr_p_instance.SCLK := clock
    ddr_p_instance.RST := 0.U
    val ddr_n_instance = Module(new ODDRX1F)
    ddr_n_instance.D0 := R_tmds_n(i)(0)
    ddr_n_instance.D1 := R_tmds_n(i)(1)
    out_n(i) := ddr_n_instance.Q.asTypeOf(out_n(i))
    ddr_n_instance.SCLK := clock
    ddr_n_instance.RST := 0.U
  }

}
Conclusion
Visiblement, le code généré doit être passé en revue par un ou une humaine histoire de corriger quelques imprécisions.
Mais cette relecture est facile, le code est très lisible et bien indenté. On retrouve les noms des signaux, variables, registres, modules Verilog. On est loin des bouillies de conversion où le code généré ressemble plus à un binaire compilé qu’à un code source «versionnable». Et cette saine relecture est de toute manière indispensable si l’on souhaite se reposer sur ce nouveau code dans la suite de son projet.
C’est un outil qui va vite devenir indispensable lorsque le besoin de convertion de code open-source se fera sentir. Et c’est une belle passerelle pour tous les habitués du Verilog qui souhaiteraient se lancer dans ce langage de haut niveau qu’est Chisel.
Des dire de l’équipe, l’outil a été testé avec succès sur le code du processeur RISC-V PicoRV32 développé par Claire Clifford (autrice de Yosys) que l’on retrouve un peu partout dans les projets open-source hardware.
C’est également une surprise de voir que ce projet est né au sein du laboratoire OVHCloud. Où l’on découvre que le fleurons du Claude français (cocorico) finance la recherche sur le matériel libre. Ceux qui ont besoin d’un article plus académique pour découvrir l’outil iront lire le papier de l’équipe ici.
Ais-je bien téléchargé la dernière version de mon gateware dans ce montage ?
C’est un problème classique quand on fait de l’embarqué, entre l’éditeur de code, la génération du code bas niveau (Verilog dans le cas de Chisel) le logiciel de synthèse/placement-routage et le téléchargement du bitstream, il y a plein de façon de se tromper de version du logiciel s’exécutant réellement dans le montage. Et l’on peu passer des heures à chercher un bug dans son système en modifiant des lignes de code alors que le problème vient d’une même (vieille) version téléchargée éternellement.
Pour s’assurer que le gateware qui se trouve dans le FPGA soit bien le dernier généré il faut trouver une manière d’y enregistrer une valeur qui sera différente à chaque fois.
On pourrait mettre une version «en dur» dans nos sources, mais l’expérience montre que l’on oublie 4 fois sur 5 de l’incrémenter avant de générer le fichier. Toute bonne développeuse et tout bon développeur versionne son projet avec un gestionnaire de version. On pourrait du coup mettre le numéro de commit. Sauf que l’on ne commit pas toujours la modification avant de la tester.
Une autre astuce consiste à mettre la date EPOCH. De cette manière nous avons la date et l’heure précise de la synthèse du gateware. Cette solution est intéressante mais elle pose rapidement un problème d’occupation du FPGA. En effet, le temps en secondes filant assez rapidement nous avons besoin de registres de 32 bits minimum voir même 64bits. Ce qui est plutôt inutile pour compter les builds …
Compter les builds ?
La voila la solution toute simple, il suffit d’enregistrer un compteur dans un fichier texte. À chaque build, une fonction vient lire la valeur et l’incrémente. Pour rester à jour il nous suffit ensuite de versionner ce fichier avec le reste du code. Même si le nombre de build est grand, on n’aura rarement besoin d’en faire plus de quelques millier, ce qui rentrera très bien dans un registre de 16 bits voir moins.
Voici comment faire en Scala avec Chisel.
Dans un package avec les utilitaires «personnel» :
package myutil
On importe les packages d’entrées sorties pour lire/écrire dans les fichiers textes:
// Pour fromFile()
import scala.io.Source
// Pour PrintWriter()
import java.io._
Puis on crée une fonction de lecture écriture dans un objet personnel MyUtility :
  def genCountVers(className: String = null): Option[Int] = {
    if(className == null){
      return None
    }
    println("generate counter for class " + className)
    val filename = "src/main/scala/util/gen_count_vers.txt"
    val versmap = scala.collection.mutable.Map[String,Int]()

    /* read file to hashmap*/
    val fp = Source.fromFile(filename)
    for(v <- fp.getLines.map(_.split(",").map(_.trim))){
      versmap(v(0)) = v(1).toInt
    }
    fp.close()

    /* get and increment version */
    val version = versmap.get(className)
    if(version == None){
      versmap(className) = 0
    } else {
      versmap(className) = version.get.toInt + 1
    }

    /* write back file*/
    val fpw = new PrintWriter(new File(filename))
    for ((hname, hvalue) <- versmap) {
      fpw.write(hname + "," + hvalue + "\n")
    }
    fpw.close()

    /* return version */
    version match {
      case Some(s) => Some(s.toInt + 1)
      case None => Some(0)
    }
  }
La fonction genCountVers() va ouvrir le fichier texte gen_count_vers.txt, qui est un «CSV» composé du nom de classes et d’un numéro. Si le nom de la classe passé en paramètre n’existe pas la fonction va l’ajouter avec un compteur à zero.
Nous n’avons plus qu’a appeler la fonction genCounterVers() avec le nom de la classe (ou autre) de notre choix pour la fourrer dans un registre lisible via notre interface (spi, wisbone, i2c, jtag, …) directement sur le FPGA :
val buildnum = MyUtility.genCounterVers("MyTopClasse").get
La présentation de Jonathan Bachrach donne les bases d’utilisation des interfaces Decoupled() en Chisel. Cependant, elle date (2013). Il est donc nécessaire de se mettre un peu à jour.
Tout d’abord, il ne faut pas oublier d’inclure le package :
import chisel3.util._
Ensuite, l’interface possède en elle même l’information de direction. Il ne faut donc pas l’inclure dans un Output()/Input() lorsqu’on le déclare dans un IO(new Bundle {}) :
// Producteur
val data = Decoupled(UInt(10.W))
// Consommateur
val data = Flipped(Decoupled(UInt(10.W)))
Et pour finir, on ne déclare plus de Reg() comme donné à la fin de la présentation. Il faut utiliser RegNext() à la place :
Chisel is a hardware description language embedded in Scala language. Compared to VHDL/Verilog Chisel it’s a high-level language. With Chisel it’s easier to parametrize and to abstract your hardware. It’s the language used for all SiFive RISC-V cores and for Google Edge TPU.
What’s great with chisel that it generate Verilog sources for synthesis. And we can use this Verilog generated design for simulation or formal prove.
Simulation can be done in Scala with chisel.testers. But this tester is mostly under development project for the moment. And there is no test library for common busses and devices like SPI, Wishbone, AXI, PWM, …
CocoTB is a cosimulation testbench framework written in Python. Main advantage of CocoTB is that you write your testbench stimulis in python language. Python is really comfortable programming language. The other advantage of using CocoTB is that there is a growing library of modules available to test devices like SPI, Wishbone, USB, uart, … And its easier to use a library than to reinvent the wheel.
Then, let’s write Chisel testbench with CocoTB !
As an example we will use the ChisNesPad project (yes, same as formal prove article).
The directory structure is following :
/
|-- build.sbt  <- scala build configuration
|-- src/   <- all chisel sources
|   |-- main/
|       |-- scala/
|           |-- chisnespad.scala <- Chisel module we will test
|           |-- snespadled.scala <- "top" module to test with
|                                    tang nano (gowin)
|-- formal/   <- formal directory
|-- platform/ <- some usefull files for synthesis with
|                final platform (gowin).
|-- cocotb/   <- python cocotb tests
    |-- chisnespad/ <- test for chisnespad core
    |   |-- Makefile    <- makefile to compile and launch simulation
    |   |-- test_chisnespad.py <- cocotb stimulis
    |-- snespadled/ <- test for «top» project that toggle leds
        |              when push buttons
        |-- Makefile
        |-- test_snespadled.py
$ cd chisNesPad/cocotb/chisnespad/
$ make
make[1]: Entering directory '/home/fabien/myapp/chisNesPad/cocotb/chisnespad'

[...] lots of compilation lines [...]

/myapp/chisNesPad/cocotb/chisnespad/build/libs/x86_64:/usr/local/lib:/usr/local/lib:/usr/local/lib:/usr/local/lib:/usr/local/lib MODULE=test_chisnespad \
        TESTCASE= TOPLEVEL=ChisNesPad TOPLEVEL_LANG=verilog COCOTB_SIM=1 \
        /usr/local/bin/vvp -M /home/fabien/myapp/chisNesPad/cocotb/chisnespad/build/libs/x86_64 -m gpivpi sim_build/sim.vvp
     -.--ns INFO     cocotb.gpi                                  gpi_embed.c:103  in embed_init_python               Using virtualenv at /home/fabien/pyenv/pyenv37/bin/python.
     -.--ns INFO     cocotb.gpi                                GpiCommon.cpp:91   in gpi_print_registered_impl       VPI registered
     0.00ns INFO     Running tests with Cocotb v1.2.0 from /home/fabien/pyenv/pyenv37/lib/python3.7/site-packages
     0.00ns INFO     Seeding Python random module with 1583180134
     0.00ns INFO     Found test test_chisnespad.always_ready
     0.00ns INFO     Found test test_chisnespad.double_test
     0.00ns INFO     Found test test_chisnespad.simple_test
     0.00ns INFO     Running test 1/3: always_ready
     0.00ns INFO     Starting test: "always_ready"
                     Description: None
VCD info: dumpfile ChisNesPad.vcd opened for output.
401300.00ns INFO     Test Passed: always_ready
401300.00ns INFO     Running test 2/3: double_test
401300.00ns INFO     Starting test: "double_test"
                     Description: None
436000.00ns INFO     Value read CAFE
470420.00ns INFO     Value read DECA
471440.00ns INFO     Test Passed: double_test
471440.00ns INFO     Running test 3/3: simple_test
471440.00ns INFO     Starting test: "simple_test"
                     Description: None
506140.00ns INFO     Value read CAFE
507160.00ns INFO     Test Passed: simple_test
507160.00ns INFO     Passed 3 tests (0 skipped)
507160.00ns INFO     *************************************************************************
                     ** TEST                          PASS/FAIL  SIM TIME(NS)  REAL TIME(S)  RATIO(NS/S) **
                     *************************************************************************
                     ** test_chisnespad.always_ready    PASS       401300.00          2.78    144519.92  **
                     ** test_chisnespad.double_test     PASS        70140.00          0.49    143736.56  **
                     ** test_chisnespad.simple_test     PASS        35720.00          0.25    144120.85  **
                     **************************************************************************************

507160.00ns INFO     *************************************************************************************
                     **                                 ERRORS : 0                                      **
                     *************************************************************************************
                     **                               SIM TIME : 507160.00 NS                           **
                     **                              REAL TIME : 3.52 S                                 **
                     **                        SIM / REAL TIME : 144276.59 NS/S                         **
                     *************************************************************************************

507160.00ns INFO     Shutting down...
make[1]: Leaving directory '/home/fabien/myapp/chisNesPad/cocotb/chisnespad'
(Note : I can’t find how to change width of code text in this #*/% wordpress )
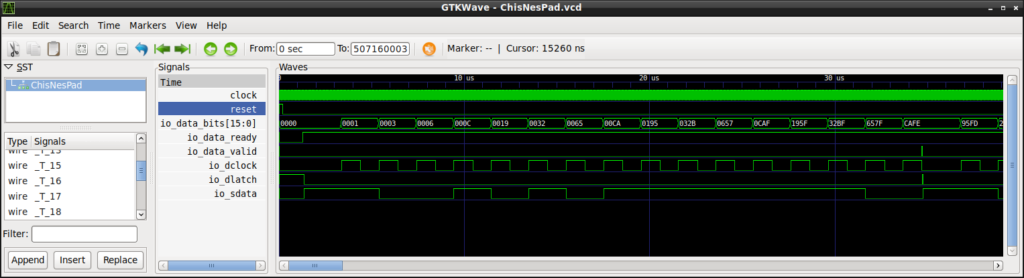
Waveform of CocoTB stimulis for NES Pad controller
Let’s see what happen
All commands are described in the Makefile in directory chisNesPad/cocotb/chisnespad/.
Chisel Module
The Chisel Module we test here is in directory src/main/scala/chisnespad/ and is named chisnespad.scala with following interfaces :
class ChisNesPad (val mainClockFreq: Int = 100,
                  val clockFreq: Int = 1,
                  val regLen: Int = 16) extends Module {
  val io = IO(new Bundle{
    /* SNES Pinout */
    val dclock = Output(Bool())
    val dlatch = Output(Bool())
    val sdata  = Input(Bool())
    /* read/valid output */
    val data = Decoupled(Output(UInt(16.W)))
  })
//...
}
The scala verilog generator driver is given at the end of file :
object ChisNesPad extends App {
  println("Generating Verilog sources for ChisNesPad Module")
  chisel3.Driver.execute(Array[String](), () => new ChisNesPad)
}
This object will be called by SBT following command:
$ sbt "runMain chisnespad.ChisNesPad"
Generated Verilog
This will generate the Verilog file named ChisNesPad.v in root directory. With following interfaces :
As we can see, all bundled ports are kept but with little modification : dot ‘.’ are replaced by underscore ‘_’. clock and reset has been added and we can retrieve our decoupled signal io.data.{ready, valid, bits} -> io_data_{ready, valid, bits} .
CocoTB testbench
With these changes in mind, we can read/write our chisel ports signals with CocoTB.
CocoTB tests are described in file test_chisnespad.py. This file describe a class to store all method and data for testing ChisNesPad Module then list cocotb test function :
# main class for all test
class ChisNesPadTest(object):
    """
    """
    LOGLEVEL = logging.INFO
    PERIOD = (20, "ns")
    SUPER_NES_LEN = 16
    NES_LEN = 8

    def __init__(self, dut, reg_init_value=0xcafe, reg_len=16):
        if sys.version_info[0] < 3:
            raise Exception("Must be using Python 3")
        self._dut = dut
#...
# all tests
@cocotb.test()
def simple_test(dut):
    cnpt = ChisNesPadTest(dut)
    yield cnpt.reset()
    yield Timer(1, units="us")
    dut.io_data_ready <= 1
#...

@cocotb.test()#skip=True)
def double_test(dut):
    cnpt = ChisNesPadTest(dut)
    yield cnpt.reset()
#...

@cocotb.test()
def always_ready(dut):
    cnpt = ChisNesPadTest(dut)
    yield cnpt.reset()
#...
Here we see tree tests decorated with @cocotb.test(). The our module ChisNesPad is the Device Under Test (DUT) and is passed in test function arguments : dut.
To access input/output ports we just have to use dot on our dut object.
set io.data.ready to logic level ‘1’ :
dut.io_data_ready <= 1
read io.data.bits
vread = int(dut.io_data_bits)
We can also read register under the module or a submodule :
countvalue = int(dut.countReg)
It’s also possible to write register under the module, but be careful of the race condition when you doing that. It can be re-written by simulation with 0-delay.
Get Waveform
All tests can be done with procedure describe above. But with Icarus as simulator we don’t get the waveforms.
It’s not easy to develop HDL without any waveform. To get waveform we can use another simulator that will generate the traces (mainly in VCD format) but Icarus is mature and free then it’s cheaper to use it.
The solution given in CocoTB documentation is to add following verilog code in top module :
`ifdef COCOTB_SIM
initial begin
  $dumpfile ("ChisNesPad.vcd");
  $dumpvars (0, ChisNesPad);
  #1;
end
`endif
With this $dumpX() function we will records all signals under the file named ChisNesPad.vcd. If we had to add this code by hand each time we re-generate verilog from Chisel module, it would quickly become painful.
$ cocotbify
Usages:
cocotbify.py [options]
-h, --help             print this help
-v, --verilog          verilog filename to modify (filename is used
                       as module name)
-o, --output filename  output filename
This tool will take a verilog source as input and generate an output with dumpvars code added for cocotb. In the example makefile the output name will be ChisNesPadCocotb.v. This file will be used by CocoTB and Icarus for simulation. VCD file can then be view with gtkwave:
$ gtkwave ChisNesPad.vcd
Simulation traces
Conclusion
As we can see, it’s perfectly possible to use CocoTB framework for testing Chisel components. CocoTB has more library test modules available than chisel.tester and we can code in Python. Python is used by lots of peoples through the world and is less scary than Scala or SystemVerilog for hardware engineers that develop digital hardware.
Formal prove is a great method to find bugs into our gateware. But for many years, this was reserved to big companies with lot of $$. Some years ago, Clifford opened the method with it’s synthesis software Yosys. Explanation about formal prove with Yosys-smtbmc and can be found in this presentation. Dan Guisselquist (ZipCPU) give lot of great tutorials on formal prove with Verilog and SystemVerilog design on it’s blog. It’s a good start to learn formal prove.
But, Yosys-smtbmc is made for Verilog (and a bit of SystemVerilog). It’s too bad but it’s the only open source formal tool available for gateware.
How can we prove our VHDL, Clash or Chisel gateware ?
One of the solution consist of writing a TOP component in SystemVerilog that integrate the assume/assert/cover method and instantiate our DUT in it. It’s the way Pepijn De Vos choose for verifying it’s VHDL gateware. Its VHDL code is converted into Verilog with the new GHDL feature not-yet-finished and a systemVerilog top component instantiate the VHDL gateware converted in verilog by GHDL synthesis feature.
That’s an interesting way to do it and it can be done in the same way with Chisel. But it’s a bit limited to input/output ports of our gateware. If we want to add some property about internal counters or flags or others internals states machines registers, we have to export it with some conditional preprocessor value like follows:
`ifdef FORMAL
// Declare some signal output ports
`endif
It’s became little bit difficult to do that with chisel and its blackbox system. Then if we want to include formal property under the verilog generated module, we have to open the generated verilog code and write it directly.
It’s not a lasting solution. Because each time we regenerate Verilog code from Chisel, each time we have to re-write formal properties. It’s rapidly become a pain !
To (temporarily) fix this problem a little python tools has been written by Martoni for injecting rules automatically under generated Verilog module. We will see how it’s work in this article with a simple project named ChisNesPad.
ChisNesPad project
ChisNesPad is a little project that aim to drive Super Nintendo Pad with an FPGA.
In electronic point of view, super nes controller is simply a 16 bits shift register.
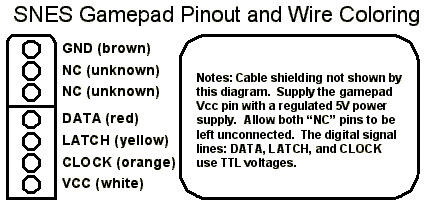
The gamepad pinout is relativelly easy to find on the web.
SuperNes gamePAD pinout
For FPGA point of view 3 signals interest us :
DATA : Gamepad output for serial datas
LATCH: Game pad input to take a « picture » of 16 buttons
A command named smtbmcify will then be available on system :
$  smtbmcify -h
Usages:
$ python smtbmcify.py [options]
-h, --help             print this help message
-v, --verilog=module.v verilog module to read
-f, --formal=formal.sv formals rules
-o, --output=name.sv   output filename, default is moduleFormal.sv
To use smtbmc formal tools with smtbmcify we will need two more source/configuration files :
ChisNesPadRules.sv That contain SystemVerilog formals properties
ChisNesPadRules.sby That contain yosys-smtbmc script configuration
These two files must be saved in formal/ directory. sby files are SymbiYosys configuration files, installation instruction of SymbiYosys can be found here.
For simply testing, the rule (written in file ChisNesPadRules.sv) we want to « inject » is following:
//BeginModule:ChisNesPad

always@(posedge clock) begin
    assume(io_dlatch == 1'b1);
    assert(stateReg == 2'b00);
end

//EndModule:ChisNesPad
With this rule, we assert that if io.dlatch output is 1, the internal stateReg will be set to sInit state (00).
The comments BeginModule and EndModule must be set with the exact chisel module name :
//...
class ChisNesPad (val mainClockFreq: Int = 100,
                  val clockFreq: Int = 1,
                  val regLen: Int = 16) extends Module {
  val io = IO(new Bundle{
//...
Hence, the tool smtbmcify will find the module in verilog generated module and inject the rules at the end of it:
Ok the test we done so far PASS without problem. Let’s find a bug adding this rules in ChisNesPadRules.sv :
always@(posedge clock) begin
    assert(regCount <= 16);
end
This rule generate a FAIL :
$ make
cd ..;sbt "runMain chisnespad.ChisNesPad"
[info] Loading project definition from /home/fabien/myapp/chisNesPad/project
[info] Loading settings for project chisnespad from build.sbt ...
[info] Set current project to chisNesPad (in build file:/home/fabien/myapp/chisNesPad/)
[warn] Multiple main classes detected.  Run 'show discoveredMainClasses' to see the list
[info] running chisnespad.ChisNesPad
Generating Verilog sources for ChisNesPad Module
[info] [0.004] Elaborating design...
[info] [1.735] Done elaborating.
Total FIRRTL Compile Time: 1396.1 ms
[success] Total time: 5 s, completed Feb 3, 2020 9:49:48 PM
smtbmcify -v ../ChisNesPad.v -f ChisNesPadRules.sv -o ChisNesPadFormal.sv
Generating file ChisNesPadFormal.sv
1 module will be filled :
ChisNesPad
rm -rf ChisNesPad
sby ChisNesPad.sby
SBY 21:49:48 [ChisNesPad] Copy 'ChisNesPadFormal.sv' to 'ChisNesPad/src/ChisNesPadFormal.sv'.
SBY 21:49:48 [ChisNesPad] engine_0: smtbmc
SBY 21:49:48 [ChisNesPad] base: starting process "cd ChisNesPad/src; yosys -ql ../model/design.log ../model/design.ys"
SBY 21:49:49 [ChisNesPad] base: finished (returncode=0)
SBY 21:49:49 [ChisNesPad] smt2: starting process "cd ChisNesPad/model; yosys -ql design_smt2.log design_smt2.ys"
SBY 21:49:49 [ChisNesPad] smt2: finished (returncode=0)
SBY 21:49:49 [ChisNesPad] engine_0: starting process "cd ChisNesPad; yosys-smtbmc --presat --unroll --noprogress -t 30 --append 0 --dump-vcd engine_0/trace.vcd --dump-vlogtb engine_0/trace_tb.v --dump-smtc engine_0/trace.smtc model/design_smt2.smt2"
SBY 21:49:49 [ChisNesPad] engine_0: ##   0:00:00  Solver: yices
SBY 21:49:49 [ChisNesPad] engine_0: ##   0:00:00  Checking assumptions in step 0..
SBY 21:49:49 [ChisNesPad] engine_0: ##   0:00:00  Checking assertions in step 0..
SBY 21:49:49 [ChisNesPad] engine_0: ##   0:00:00  Checking assumptions in step 1..
SBY 21:49:49 [ChisNesPad] engine_0: ##   0:00:00  Checking assertions in step 1..
SBY 21:49:49 [ChisNesPad] engine_0: ##   0:00:00  BMC failed!
SBY 21:49:49 [ChisNesPad] engine_0: ##   0:00:00  Assert failed in ChisNesPad: ChisNesPadFormal.sv:230
SBY 21:49:49 [ChisNesPad] engine_0: ##   0:00:00  Writing trace to VCD file: engine_0/trace.vcd
SBY 21:49:49 [ChisNesPad] engine_0: ##   0:00:00  Writing trace to Verilog testbench: engine_0/trace_tb.v
SBY 21:49:49 [ChisNesPad] engine_0: ##   0:00:00  Writing trace to constraints file: engine_0/trace.smtc
SBY 21:49:49 [ChisNesPad] engine_0: ##   0:00:00  Status: failed (!)
SBY 21:49:49 [ChisNesPad] engine_0: finished (returncode=1)
SBY 21:49:49 [ChisNesPad] engine_0: Status returned by engine: FAIL
SBY 21:49:49 [ChisNesPad] summary: Elapsed clock time [H:MM:SS (secs)]: 0:00:00 (0)
SBY 21:49:49 [ChisNesPad] summary: Elapsed process time [H:MM:SS (secs)]: 0:00:00 (0)
SBY 21:49:49 [ChisNesPad] summary: engine_0 (smtbmc) returned FAIL
SBY 21:49:49 [ChisNesPad] summary: counterexample trace: ChisNesPad/engine_0/trace.vcd
SBY 21:49:49 [ChisNesPad] DONE (FAIL, rc=2)
make: *** [Makefile:10: ChisNesPad/PASS] Error 2
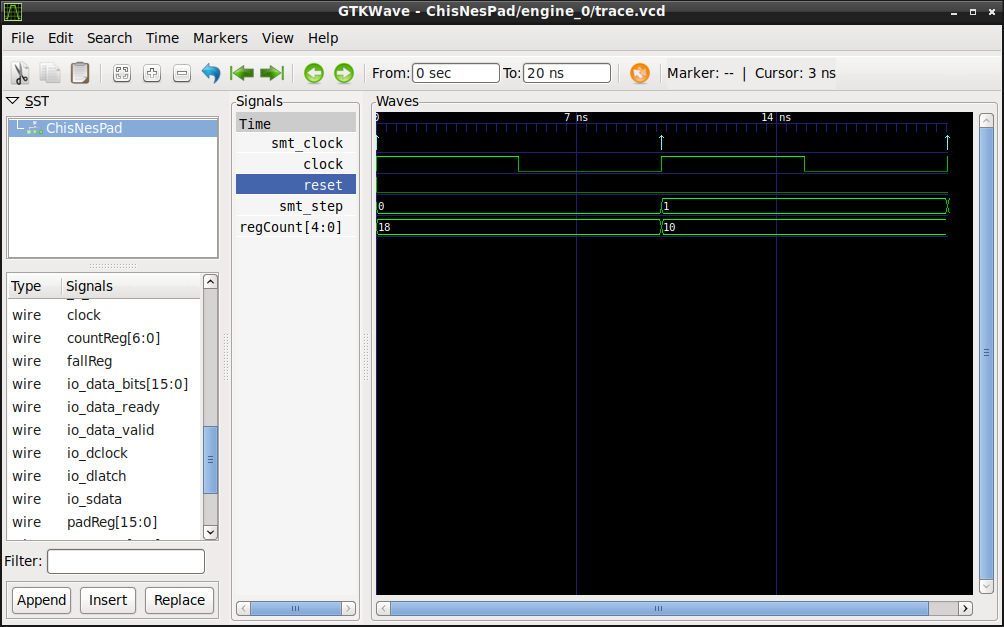
An error is found at second step. A vcd trace is generated that we can see with gtkwave:
$ gtkwave ChisNesPad/engine_0/trace.vcd
Formal engine found a bug, and print it as a VCD trace
We can also get verilog testbench that reproduce the bug under the same directory (trace_tb.v).
The problem here is that we didn’t define initial reset condition as explained in ZipCPU course. To solve this problem we have to change the rule adding initial rules (reset should be set at the begining) and assert counter value only when reset is not set :
initial
    assume(reset==1'b1);

always@(posedge clock) begin
    if(reset == 1'b0)
        assert(regCount <= 16);
end
With that rules, it pass :
$ make
cd ..;sbt "runMain chisnespad.ChisNesPad"
[info] Loading project definition from /home/fabien/myapp/chisNesPad/project
[info] Loading settings for project chisnespad from build.sbt ...
[info] Set current project to chisNesPad (in build file:/home/fabien/myapp/chisNesPad/)
[warn] Multiple main classes detected.  Run 'show discoveredMainClasses' to see the list
[info] running chisnespad.ChisNesPad
Generating Verilog sources for ChisNesPad Module
[info] [0.004] Elaborating design...
[info] [1.612] Done elaborating.
Total FIRRTL Compile Time: 1324.0 ms
[success] Total time: 5 s, completed Feb 3, 2020 10:04:37 PM
smtbmcify -v ../ChisNesPad.v -f ChisNesPadRules.sv -o ChisNesPadFormal.sv
Generating file ChisNesPadFormal.sv
1 module will be filled :
ChisNesPad
rm -rf ChisNesPad
sby ChisNesPad.sby
SBY 22:04:38 [ChisNesPad] Copy 'ChisNesPadFormal.sv' to 'ChisNesPad/src/ChisNesPadFormal.sv'.
SBY 22:04:38 [ChisNesPad] engine_0: smtbmc
SBY 22:04:38 [ChisNesPad] base: starting process "cd ChisNesPad/src; yosys -ql ../model/design.log ../model/design.ys"
SBY 22:04:38 [ChisNesPad] base: finished (returncode=0)
SBY 22:04:38 [ChisNesPad] smt2: starting process "cd ChisNesPad/model; yosys -ql design_smt2.log design_smt2.ys"
SBY 22:04:38 [ChisNesPad] smt2: finished (returncode=0)
SBY 22:04:38 [ChisNesPad] engine_0: starting process "cd ChisNesPad; yosys-smtbmc --presat --unroll --noprogress -t 30 --append 0 --dump-vcd engine_0/trace.vcd --dump-vlogtb engine_0/trace_tb.v --dump-smtc engine_0/trace.smtc model/design_smt2.smt2"
SBY 22:04:38 [ChisNesPad] engine_0: ##   0:00:00  Solver: yices
SBY 22:04:38 [ChisNesPad] engine_0: ##   0:00:00  Checking assumptions in step 0..
[...]
SBY 22:04:39 [ChisNesPad] engine_0: ##   0:00:00  Checking assertions in step 29..
SBY 22:04:39 [ChisNesPad] engine_0: ##   0:00:00  Status: passed
SBY 22:04:39 [ChisNesPad] engine_0: finished (returncode=0)
SBY 22:04:39 [ChisNesPad] engine_0: Status returned by engine: pass
SBY 22:04:39 [ChisNesPad] summary: Elapsed clock time [H:MM:SS (secs)]: 0:00:00 (0)
SBY 22:04:39 [ChisNesPad] summary: Elapsed process time [H:MM:SS (secs)]: 0:00:00 (0)
SBY 22:04:39 [ChisNesPad] summary: engine_0 (smtbmc) returned pass
SBY 22:04:39 [ChisNesPad] DONE (PASS, rc=0)
This is just a little introduction on how to use yosys-smtbmc and symbiYosys to formally prove your chisel design.
Maybe this formal rules injector will be integrated in Chisel a day ?
class RValue (val cSize: Int = 16) extends Bundle {
  val rvalue = Output(UInt(cSize.W))
  val er     = Output(UInt((cSize/2).W))
  val part   = Output(Bool()) /* set if value is partial */
}
And we want to make a register with initialized value we can use the new interface named BundleLiterals:
It can be usefull to be able to test code in console before launching the big compilation. It’s possible in directory where your project build.sbt is :
$ cd myproject/
$ sbt
sbt:myproject> console
scala>
And once in the scala console chisel import can be done :
«Digital Design with Chisel» n’est pas un manuel d’utilisation des ciseaux à bois.
Le livre de Martin Schoerberl «Digital Design with Chisel» est à ma connaissance le premier livre papier concernant le langage de description matériel Chisel.
Le livre — en anglais mais on s’en doute — est une excellente introduction au langage de description matériel Chisel. Avec lui il est même possible de commencer la conception numérique (digital design) en Chisel sans avoir à mettre les mains dans le VHDL ou le Verilog.
Ce manuel se veut un guide pratique de démarrage, on commence avec la description de l’installation des outils pour faire tourner Chisel tout en faisant une (très) rapide introduction à Scala. Scala est le langage utilisé pour Chisel.
Après avoir décrit les composants de bases du langage, l’auteur s’attaque à la description d’un projet Chisel avec l’architecture des sources, testbench et autres makefile et built.sbt . On attaque ensuite les différentes structures un peu plus avancées de la construction numérique comme les machines d’états, les FIFO, ports séries pour aller jusqu’à la conception d’un processeur simple.
Le livre se termine par un chapitre expliquant comment contribuer au projet initié à Berkeley.
C’est un excellent manuel pour mettre le pied à l’étrier de la conception numérique avec un langage moderne (SSHDL). Bien sûr ça n’est pas en 130 pages que l’on fera le tour du langage, ça n’est pas non plus un manuel de référence exhaustif. Pour le manuel de référence on se référera au site officiel, et pour se souvenir des mots clefs on ira télécharger la «cheat sheet».
Le livre est disponible en impression amazon pour ~10$. Comme c’est un livre «libre» il est également disponible avec ses sources sur le github de l’auteur.